 Pin it
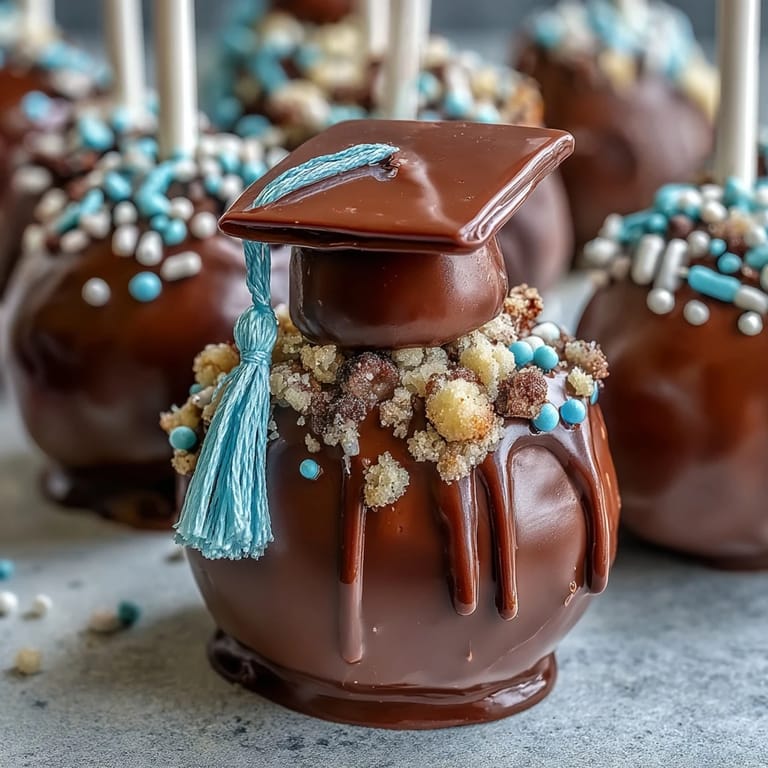
 The first time I made graduation cake pops, the kitchen was buzzing with excitement and the smell of warm vanilla cake mixed with anticipation. As I mixed school-colored candy melts, I couldn’t help but laugh at the splatters covering my apron, a badge of messy celebration. Every cake pop felt like a tiny trophy, and the process was oddly therapeutic—rolling little spheres and imagining the smiles they’d bring. The colors reminded me of pep rallies, confetti, and friendships, and stirring up frosting felt like a secret ingredient for joy. Even if you’re not a cake pop pro, these are a fun way to mark the moment.
I remember frantically assembling these for my cousin’s graduation, when we realized the party needed something extra. My little brother insisted on adding extra sprinkles, and we ended up with cake pops more glittery than the graduate’s cap. We laughed about the lollipop sticks falling over, and by serving time, each pop stood tall like mini diplomas. It was the first dessert snatched from the table, and afterward everyone wanted their own in school colors. Those messy hands made for perfect photos.
Ingredients
- Cake: Whether you use a boxed mix or homemade, letting it cool completely keeps the cake firm and crumbly, perfect for mixing.
- Frosting: Cream cheese or buttercream makes the pops rich and binds everything together—start with half and add more if needed.
- Candy melts or chocolate: Picking your school colors sparks instant party magic, and a little shortening makes dipping easier.
- Sprinkles, edible glitter, colored sugar: Fun accents that make each pop feel festive—don’t shy away from mixing textures and colors.
- Lollipop sticks: Essential for the classic cake pop shape; make sure they’re sturdy enough for picking up and serving.
- Mini chocolate chips: These tiny bits make adorable tassels or decorations for graduation caps.
- Fondant (optional): Helps create graduation cap tops and can be tinted to match any school.
Tired of Takeout? 🥡
Get 10 meals you can make faster than delivery arrives. Seriously.
One email. No spam. Unsubscribe anytime.
Instructions
- Bake and Cool:
- Prepare your cake following the box or recipe directions, then let it cool completely so it's easy to crumble.
- Crumble the Cake:
- Break up the cooled cake in a big bowl, using your hands or a fork; it should resemble moist sand.
- Add Frosting:
- Mix frosting in small batches until the crumbs stick together when squeezed, avoiding a soggy texture.
- Shape Balls:
- Roll tablespoon-sized portions into balls, setting each on a lined tray; aim for even, bite-sized rounds.
- Chill the Pops:
- Refrigerate for an hour, or freeze twenty minutes, so they're firm and ready for dipping.
- Melt the Coating:
- Microwave candy melts or chocolate, stirring between intervals; add shortening if it's too thick, until it’s silky and smooth.
- Stick and Prep:
- Dip each lollipop stick into melted coating, then push halfway into each cake ball, which helps them stay secure.
- Dip and Decorate:
- Fully submerge each pop in the colored coating, gently tap off excess, and swiftly add sprinkles or sugar before it sets.
- Create Caps:
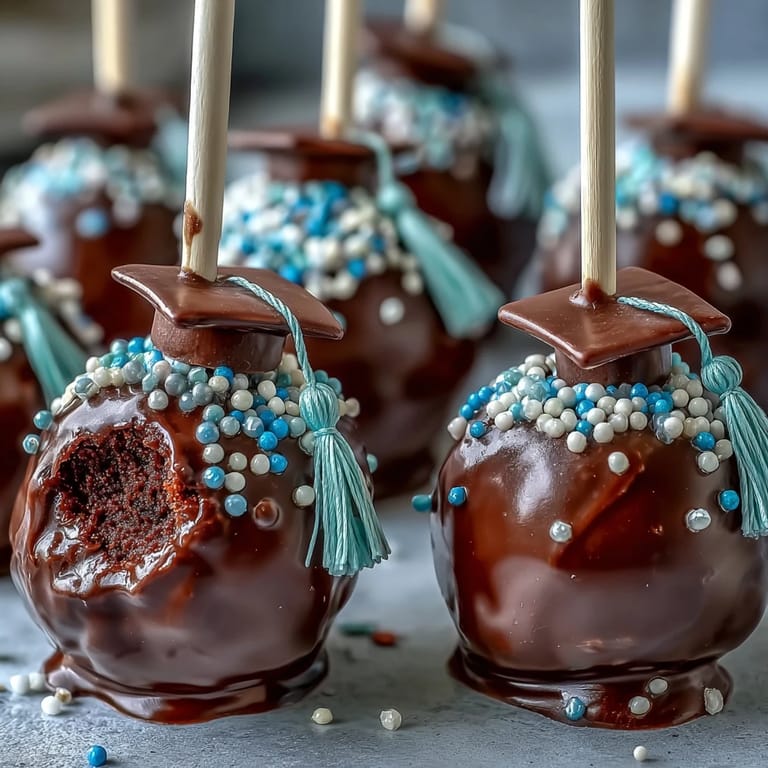
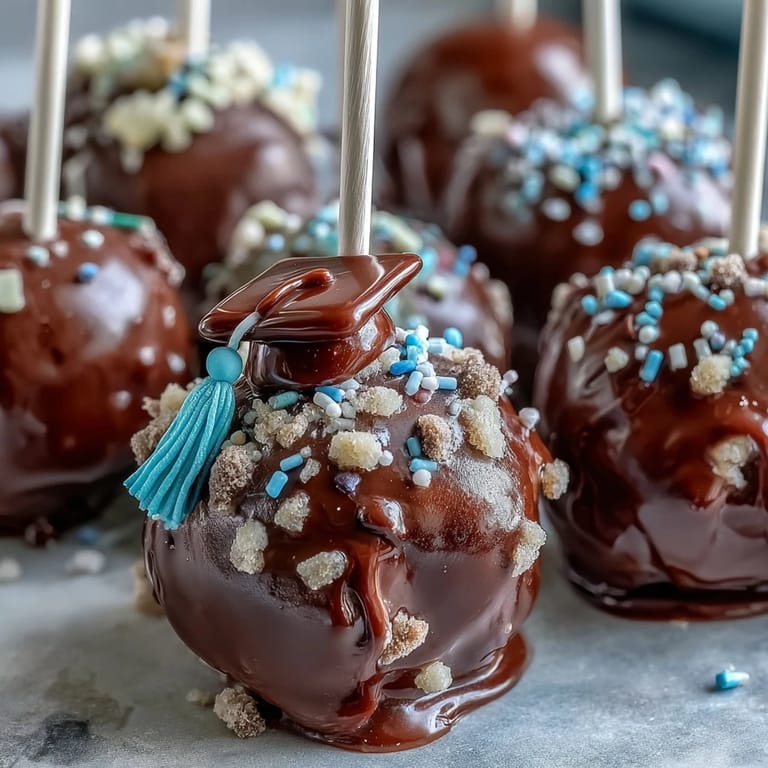
- Press a fondant square atop pops and attach a mini chip with melted chocolate for a festive graduation cap look.
- Set and Serve:
- Stand the pops in a styrofoam block or holder; let them harden completely so they’re party-perfect and easy to grab.
 Pin it
 When my friends finally tasted these cake pops at our graduation picnic, the quiet pause before everyone’s first bite told me I had nailed it. Suddenly, the chatter turned to cheers, and for a moment the treats felt like part of our celebration rather than just dessert. It was a sweet reminder of how food can become a centerpiece for shared memories.
How to Personalize Your Pops
If you want every cake pop to reflect your school spirit, mix up different colored coatings and layer on extras like edible markers or colored fondant. One year, we used blue glitter and gold stars for a college team sendoff, and each pop was a tiny work of art. Simple switches let you create a unique batch every time.
Choosing the Best Cake Mix
I found that mixing a classic vanilla with a touch of almond extract brings out a richer flavor than plain boxed cake. Chocolate works beautifully, too, especially for creating darker colored pops that match graduation robes. Don’t be afraid to experiment—if you mess up, the frosting covers minor flaws!
Troubleshooting Cake Pops
If your cake pops are cracking or sliding off, it usually means the cake mixture is too moist or the pops are too warm when dipping. Letting the balls chill longer really helps. Also, keep your dipping chocolate warm but not hot.
- Never skip the chilling—it's the secret to sturdy pops.
- If coating gets thick, add a little more shortening and stir gently.
- Don’t forget to let pops set fully before packing or serving.
 Pin it
 Whether you’re crafting these as a surprise or in a flurry of celebration, cake pops bring color and joy to any graduation table. Enjoy the process—and be ready for requests to make them again at every milestone!
Questions & Answers
- → How do you make cake pops moist and tasty?
Combine cooled cake crumbs with creamy frosting to ensure cake pops stay moist and flavorful.
- → What kind of chocolate can be used for coating?
Use candy melts or white chocolate with food coloring to match your school’s colors.
- → How can decorations be customized for graduation?
Add fondant caps, tassels with mini chocolate chips, and colored sprinkles to highlight graduation themes.
- → Can cake pops be made gluten-free?
Use gluten-free cake mix or ingredients and check all decoration labels for allergen information.
- → How should cake pops be stored?
Store finished pops in an airtight container at room temperature for up to 3 days or refrigerate for a week.
- → What tools are required for making cake pops?
You'll need mixing bowls, a baking sheet, microwave-safe bowl, lollipop sticks, spatula, and a stand for setting.